Guide
Green Background Remover
Short answer: a green background remover is doing two different jobs, and knowing which one you are fighting tells you which control to touch. Job one is colour separation — deciding which pixels are background. That part is easy and almost any keyer gets it right in one click. Job two is edge reconstruction — rebuilding what the boundary between subject and screen looked like. That part is where every cutout either looks clean or looks chewed, and no slider removes a problem that was photographed in.
| What you see | Which job failed | What to change |
|---|---|---|
| Whole background still there | Colour, not picked up | Click the screen colour with the eyedropper, then raise tolerance |
| Background gone, edge looks bitten | Edge, too aggressive | Lower tolerance, raise edge softness |
| Subject outlined in green | Edge, spill | Raise spill removal before touching tolerance |
| Holes punched inside the subject | Colour, false positive | The subject contains the screen colour — see below |
| Clean edge, double outline | Neither — motion blur | Not a keying problem. Re-shoot or accept it |
Open the green screen remover — free, no account, and the image never leaves your browser, so you can test a frame against every control as many times as you like.
Why the colour is the easy job
A screen colour is chosen because it is unlikely to appear in a face, a wall or a product. That is the whole trick: a green background is a colour that mostly does not occur elsewhere in the frame, so separating it is closer to arithmetic than to judgement. The page converts each pixel to luma and chroma, measures how far its chroma sits from the key colour you picked, and calls anything inside that distance background. Raise the distance and more of the screen disappears — along with more of your subject. That is the entire trade, and it is why tolerance is the wrong first move for most complaints.
The four things that actually break a green background
1. Spill — the screen lighting your subject
A green screen is a light source. It bounces onto shoulders, hair and shirt collars, so the subject's own edge is tinted with the colour you are trying to delete. The pixels at that edge are genuinely part-green, which means a keyer that deletes green will delete part of the person. Spill removal is the control for this: it walks the colour back toward neutral instead of deleting the pixel. If your cutout looks like it has been outlined with a green pen, you have a spill problem, not a tolerance problem — raising tolerance just eats more of the edge.
2. Fine edges — hair, fur, mesh, thin straps
These areas are where the subject and screen were never cleanly separable in the photograph: a single pixel may be half hair and half screen. Any one-value-per-pixel decision will be wrong here, which is why softness exists — it lets the boundary pixels keep partial transparency instead of being forced to fully opaque or fully gone. Judge this one at 100% or 400% zoom, never at fit-to-window, because a chewed hair edge looks perfectly acceptable when the whole photo is on screen.
3. Motion blur and shutter smear
This is the failure that no control fixes, and it is worth recognising early so you stop adjusting sliders. If the subject or the camera moved during the exposure, the screen colour is physically mixed into the subject over a band several pixels wide. There is no boundary left to find — the photo contains a permanent blend of person and green. The only real remedies are on the other side of the shutter: a faster shutter speed, more light, or keeping the subject still.
4. When the subject contains the screen colour
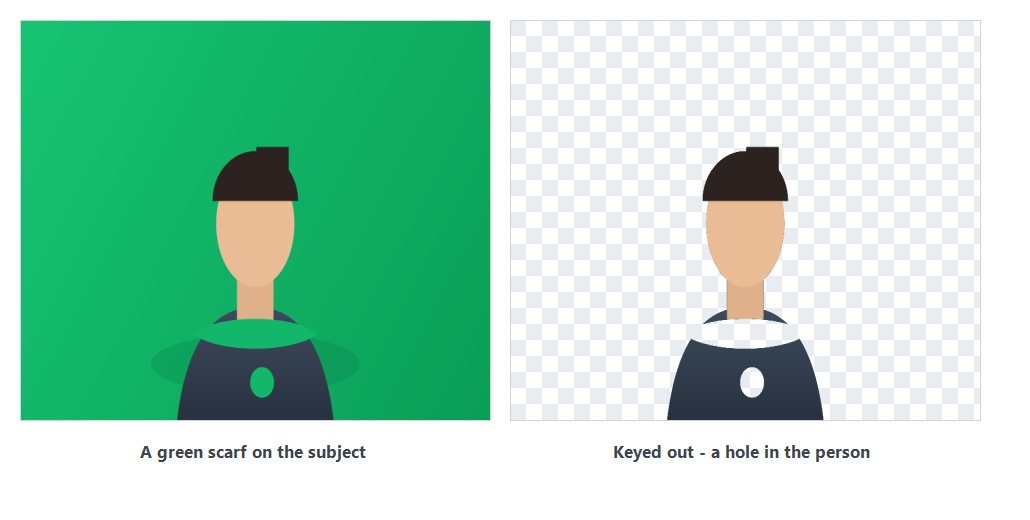
A green shirt, a green product label, a houseplant, a reflective surface catching the screen: each is a pixel that should be kept and that matches the colour you told the tool to delete. The result is a hole in the middle of the subject rather than a bad edge. No amount of tolerance tuning distinguishes them, because at the pixel level they are the same colour. The fixes are practical rather than technical: re-shoot against a different screen colour, keep the subject's own colours off the screen's hue, or flag the hue so it is preserved before keying. Semi-transparent subjects — glass, smoke, a veil — sit in the same category: they were never fully opaque, so a fully transparent result is the honest expectation, not a bug.
A 60-second self-check before you export
Do not judge a cutout on the white page background of the tool. A bad edge hides on light and shows on dark, and vice versa.
- Put the result on a checkerboard background. That is the standard way to see transparency itself, rather than the colour you happened to preview against.
- Check it on both black and white. Light fringe is invisible on white; dark fringe is invisible on black.
- Zoom to 100% and walk the edge once. If you cannot see the boundary artefact at 100%, it will not survive being viewed at full size either.
- Look at the alpha, not the colour. A pixel that is transparent and mid-green is correct; a pixel that is opaque and mid-green is a leftover.
- Export as PNG if you want the transparency to survive the trip. A format without an alpha channel will flatten your cutout onto a solid colour and undo the work.
What this tool does, and where it stops
Being precise about the boundary is more useful than a longer feature list.
- Still images. It keys a photo and returns a transparent PNG at the original resolution. It does not process video frames.
- One file at a time. There is no batch queue and no history — close the tab and the result is gone, because nothing was stored anywhere.
- Browser only. The pixel work happens in the page you are looking at. Your file is not uploaded to a server, and no account is required.
- The screen colour has to be in the photo. This is a chroma key tool, not a subject-recognition tool. If there was no green or blue screen behind the subject, there is nothing here to key.
Questions
Is a green background easier to remove than a blue one? For digital photos, usually yes — sensors record more green detail, so edges carry more information to work with. Blue wins for subjects that are themselves green.
Does a higher tolerance give a cleaner result? Usually the opposite. Tolerance decides how much is deleted; softness decides how the boundary is rebuilt. Most complaints about a chewed edge are improved by lowering tolerance and raising softness.
Why is there still a green line around my cutout after the background is gone? That is spill, not leftover background. It needs spill removal, because the affected pixels are part person.
Open the green screen remover — free, no signup, and your image never leaves the browser. If the edge still is not right, the symptom-by-symptom table on fixing a green screen removal walks through the controls in order.